(5/5) Collect traces with Elastic APM for monitoring Kubernetes
Elastic APM is an application performance monitoring system built on the Elastic Stack. It allows you to monitor software services and applications in real time — collect detailed performance information on response time for incoming requests, database queries, calls to caches, external HTTP requests, and more. This makes it easy to pinpoint and fix performance problems quickly.
Elastic APM is OpenTracing compliant which means you can take advantages of the large range of libraries already available to trace components within your application (e.g MongoDB instrumentation).
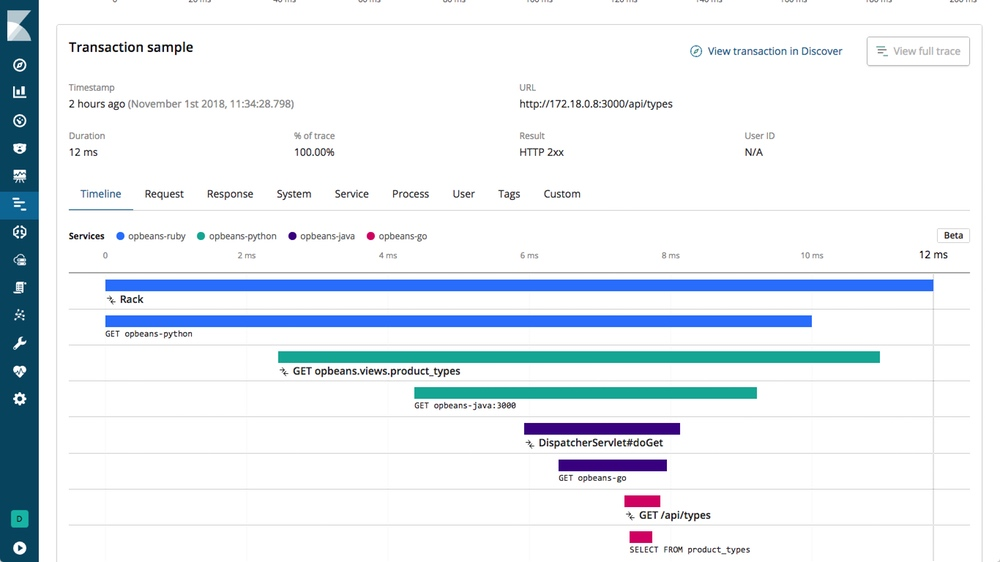
For example, you will be able to follow a request in a highly distributed environment (micro-service architecture) and find potential bottleneck easily and quickly.
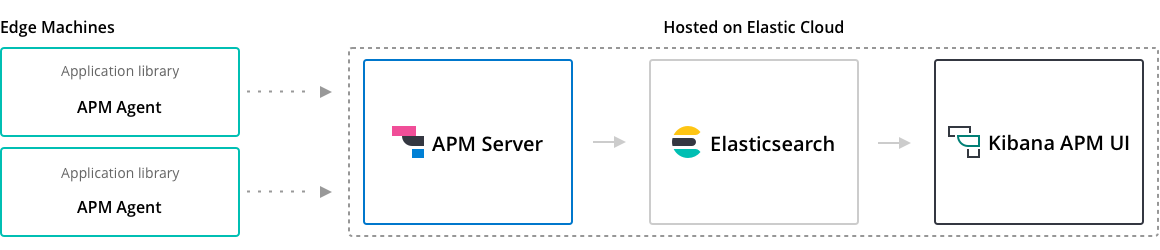
Elastic APM is composed of a component called APM-Server used to collect and ship traces to ElasticSearch and individual agents running with the application or service.
Install APM-Server
We first need to install APM-Server on k8s to collect the traces for the agents and forward them to ElasticSeach.
It's composed of a ConfigMap to configure the settings:
## apm.configmap.yml
---
apiVersion: v1
kind: ConfigMap
metadata:
  namespace: monitoring
  name: apm-server-config
  labels:
    app: apm-server
data:
  apm-server.yml: |-
    apm-server:
      host: "0.0.0.0:8200"

    output.elasticsearch:
      hosts: ['${ELASTICSEARCH_HOST:elasticsearch}:${ELASTICSEARCH_PORT:9200}']
      username: ${ELASTICSEARCH_USERNAME}
      password: ${ELASTICSEARCH_PASSWORD}

    setup.kibana:
      host: '${KIBANA_HOST:kibana}:${KIBANA_PORT:5601}'
---
APM-Server needs to expose the port 8200 to allow the agent to forward their traces. The following Service exposes this port to the environment:
## apm.service.yml
---
apiVersion: v1
kind: Service
metadata:
  namespace: monitoring
  name: apm-server
  labels:
    app: apm-server
spec:
  ports:
  - port: 8200
    name: apm-server
  selector:
    app: apm-server
---
The last bit is the Deployment describing the container to be deployed:
## apm.deployment.yml
---
apiVersion: extensions/v1beta1
kind: Deployment
metadata:
  namespace: monitoring
  name: apm-server
  labels:
    app: apm-server
spec:
  replicas: 1
  template:
    metadata:
      labels:
        app: apm-server
    spec:
      containers:
      - name: apm-server
        image: docker.elastic.co/apm/apm-server:7.3.0
        env:
        - name: ELASTICSEARCH_HOST
          value: elasticsearch-client.monitoring.svc.cluster.local
        - name: ELASTICSEARCH_PORT
          value: "9200"
        - name: ELASTICSEARCH_USERNAME
          value: elastic
        - name: ELASTICSEARCH_PASSWORD
          valueFrom:
            secretKeyRef:
              name: elasticsearch-pw-elastic
              key: password
        - name: KIBANA_HOST
          value: kibana.monitoring.svc.cluster.local
        - name: KIBANA_PORT
          value: "5601"
        ports:
        - containerPort: 8200
          name: apm-server
        volumeMounts:
        - name: config
          mountPath: /usr/share/apm-server/apm-server.yml
          readOnly: true
          subPath: apm-server.yml
      volumes:
      - name: config
        configMap:
          name: apm-server-config
---
See the full file
We can now deploy this new component of our stack:
$ kubectl apply  -f apm.deployment.yml \
                 -f apm.service.yml \
                 -f apm.deployment.yml

configmap/apm-server-config created
service/apm-server created
deployment.extensions/apm-server created
Check that everything is up and running:
$ kubectl get all -n monitoring -l app=apm-server

NAME                              READY   STATUS    RESTARTS   AGE
pod/apm-server-759bb8f584-rkzvn   1/1     Running   0          55s

NAME                 TYPE        CLUSTER-IP       EXTERNAL-IP   PORT(S)    AGE
service/apm-server   ClusterIP   10.101.235.230   <none>        8200/TCP   55s

NAME                         READY   UP-TO-DATE   AVAILABLE   AGE
deployment.apps/apm-server   1/1     1            1           55s

NAME                                    DESIRED   CURRENT   READY   AGE
replicaset.apps/apm-server-759bb8f584   1         1         1       55s
We now can install an agent on our Spring-Boot app.
Configure a Java agent on the application
In the last part of this article, we will configure a Elastic APM Java agent on the sample application spring-boot-simple.
First we need to put the jar elastic-apm-agent-1.8jar in the container. Add the following line to download the agent JAR when docker builds the image.
RUN wget -O /apm-agent.jar https://search.maven.org/remotecontent?filepath=co/elastic/apm/elastic-apm-agent/1.8.0/elastic-apm-agent-1.8.0.jar
FROM openjdk:8-jdk-alpine

COPY target/spring-boot-simple.jar /app.jar

RUN wget -O /apm-agent.jar https://search.maven.org/remotecontent?filepath=co/elastic/apm/elastic-apm-agent/1.8.0/elastic-apm-agent-1.8.0.jar

CMD java -jar /app.jar
Secondly add the following dependencies to your application, so your will be able to integrate open-tracing libraries (read more) and/or manually instrument some components with the Elastic APM API (read more).
        <dependency>
            <groupId>co.elastic.apm</groupId>
            <artifactId>apm-agent-api</artifactId>
            <version>${elastic-apm.version}</version>
        </dependency>
        <dependency>
            <groupId>co.elastic.apm</groupId>
            <artifactId>apm-opentracing</artifactId>
            <version>${elastic-apm.version}</version>
        </dependency>
        <dependency>
            <groupId>io.opentracing.contrib</groupId>
            <artifactId>opentracing-spring-cloud-mongo-starter</artifactId>
            <version>${opentracing-spring-cloud.version}</version>
        </dependency>
Then we will change the Deployment to start the Spring-Boot application with the Java agent enabled and connected to the APM-server.
## spring-boot-simple.deployment.yml
---
apiVersion: apps/v1
kind: Deployment
metadata:
  namespace: default
  name: spring-boot-simple
  labels:
    app: spring-boot-simple
spec:
  replicas: 1
  selector:
    matchLabels:
      app: spring-boot-simple
  template:
    metadata:
      labels:
        app: spring-boot-simple
    spec:
      containers:
      - image: gjeanmart/spring-boot-simple:0.0.1-SNAPSHOT
        imagePullPolicy: Always
        name: spring-boot-simple
        command:
          - "java"
          - "-javaagent:/apm-agent.jar"
          - "-Delastic.apm.active=$(ELASTIC_APM_ACTIVE)"
          - "-Delastic.apm.server_urls=$(ELASTIC_APM_SERVER)"
          - "-Delastic.apm.service_name=spring-boot-simple"
          - "-jar"
          - "app.jar"
        env:
          - name: SPRING_DATA_MONGODB_HOST
            value: mongo
          - name: ELASTIC_APM_ACTIVE
            value: "true"
          - name: ELASTIC_APM_SERVER
            value: http://apm-server.monitoring.svc.cluster.local:8200
        ports:
        - containerPort: 8080
---
Now reapply the Deployment and spring-boot-simple should restart:
$ kubectl apply -f spring-boot-simple.yml
Execute a few calls such as:
get messages
Command to retrieve all the messages posted.
$ curl -X GET http://10.154.0.2:30049/message
get messages (slow request)
Use the attribute sleep=<ms> to slow down the request.
$ curl -X GET http://10.154.0.2:30049/message?sleep=3000
get messages (error)
Use the attribute error=true to raised an exception during the execution.
$ curl -X GET http://10.154.0.2:30049/message?error=true
Now go to Kibana in the section "APM" and you should see the application spring-boot-simple, click on it.
Detect recurrent errors:

Visualize applications metrics (e.g. HeapSize, GC)

Summary
Hopefully, this series of articles helped you understand how to deploy a monitoring on your Kubernetes environment with a minimal impact and a lots of perspectives to observe, track, prevent, alert and speed up the resolution of production issues.
- Kauri original title: (5/5) Collect traces with Elastic APM for monitoring Kubernetes
- Kauri original link: https://kauri.io/55-collect-traces-with-elastic-apm-for-monitoring/bbbc0af03721495b886567ce6af6c59e/a
- Kauri original author: Grégoire Jeanmart (@gregjeanmart)
- Kauri original Publication date: 2020-04-15
- Kauri original tags: kubernetes, elasticsearch, k8s, metricbeat, monitoring, kibana, filebeat
- Kauri original hash: QmRxombZcGthVgQ9BEjUP36cbcdSAdsZKeQWs7jt99nCZR
- Kauri original checkpoint: unknown