Understanding IPFS in Depth(1/6) A Beginner to Advanced Guide
This post marks the first in a new “Understanding IPFS in Depth” series which will help anybody to understand the underlying concepts of IPFS. We will keep the series as fun and engaging as possible 😊
This series is divided into 6 parts:
-
Understanding IPFS in Depth(1/6): A Beginner to Advanced Guide: In this part, we will try to understand What IPFS is, Why do we need it and What we can do with it. We will cover all the underlying components of IPFS in brief(which will be explained in depth in further parts) and see how they work together. If you want a short summary and don’t want to understand what’s happening “under the hood”, then this part is for you 😊
-
Understanding IPFS in Depth(2/6): What is InterPlanetary Linked Data(IPLD)?: In this part, we will dive into the data model of the content-addressable web. We will explore the details and specs of IPLD and play with it to get more familiar with it.
-
Understanding IPFS in Depth(3/6): What is InterPlanetary Naming System(IPNS)?: In this part, we will dive into the naming System of the distributed web. We will discuss it’s working, specs and play with it. We will also compare it to today’s naming system, aka the DNS. We will create a list of pros and cons of IPNS vs DNS.
-
Understanding IPFS in Depth(4/6): What is MultiFormats?: In this part, we will talk about Why we need Multiformat, How it works and What you as a user/developer can do with it?
-
Understanding IPFS in Depth(5/6): What is Libp2p?: In this part, we will study the networking Layer of IPFS and what it contributes to the awesomeness of IPFS. We will go through it’s working, specs and play around with it to understand it more clearly.
-
Understanding IPFS in Depth(6/6): What is Filecoin?: In this part, we discuss the incentivization layer of IPFS, filecoin. We discuss it’s whitepaper and it’s implementation specs including DSN(Distributed Storage Network), Proof-of-replication, Proof of Storage, Data storage and retrieval markets and Smart contract implementation on Filecoin protocol. We also discuss some flaws in filecoin protocol which are not mentioned in the whitepaper and suggest some improvements in filecoin protocol.
Have any query about the articles or just wanna hit me up? Head here.
In case you want to know about similar projects, here is a list:
StoragePedia: An Encyclopedia of 5 Blockchain Storage Platforms: An In-depth Comparison of all major Distributed/Decentralized Storage Platforms
If you like high-tech Web3 concepts explained in simple words with interactive tutorials, then head here:
I hope you learn a lot about IPFS from this series. Let’s start!
A Complete Guide Including IPLD, Libp2p, MultiFormats & Filecoin
When you ask someone about the latest Avenger’s movie, they probably aren’t going to say something like “the one on this server, at this sub-domain, under this file path, slash Marvel dash Avengers dot mp4”. Instead, they’re probably going to describe the content of the video: “the one in which half of the universe is destroyed by Thanos…”. This is obviously an intuitive way to think about content for humans but is generally NOT how we access content on the web today. Having said that, decentralized protocols such as IPFS actually do use this type of content addressing (labeling and finding content using the content of the file) to find content on the decentralized web. In this article, we’ll explore a little bit how this whole process works, what are the different components involved and how they work together. We will do this by adding a file to IPFS and then exploring what happens when we add a file to IPFS.
Let’s start by adding a photo to IPFS. We will add this one…
BTW, you will have to install IPFS on your system to follow along with me. You can install it from here. After installing IPFS, you have to start IPFS daemon(the software which communicates with the IPFS network in order to add and retrieve data from the network). You can start the daemon by ipfs daemon
ipfs daemon
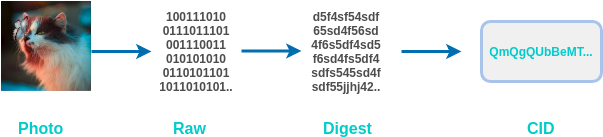
When you add the photo to IPFS, this is what happens:
On terminal I get this:

You can see the final hash here:
QmQgQUbBeMTnH1j3QWwNw9LkXjpWDJrjyGYfZpnPp8x5Lu
But we don’t see anything related to the 2 steps(Raw and Digest). This all happens under the hood.
When we added the image, we converted the image into the Raw data which a computer can understand. Now, to make it content-addressable (the thing that we talked about above) we have to come up with a method by which we can convert this image data to a label which uniquely identifies it’s content.
This is where hash functions come into play.
Hash functions take the data (any data from texts, photos, whole bible etc.) as input and give us an output (Digest) which is unique with respect to its output. If we change even a pixel in this image then the output will be different. This shows its tamper-proof property, hence making IPFS a Self-certifying File System. So if you transfer this image to anybody, he/she can check that if the photo received has been tampered with or not.
Also, you cannot tell what was the input (in this case, cat photo), but just seeing its output (the Digest). So, this also ensures a great amount of security.
Now we pass the Raw image data into SHA256 hash function and get the unique Digest. Now, we need to convert this Digest into a CID(Content Identifier). This CID is what IPFS will search for when we try to get back the image. For doing this, IPFS uses something called Multihash.
To understand the significance of Multihash, consider this situation.
You stored this image on the internet and you have its CID, which you can give to anybody who wants to get this image. Now, what if you discover in future that SHA256 is broken(this would mean that this process is NO more tamper-proof and secure) and you want to use SHA3(to ensure tamper-proofing and security) instead? This would mean changing the whole process of converting your photo to CID, and the previous CIDs will be useless…
This above problem may seem a small issue in this context, but you should know that these hash functions secure TRILLIONS of dollars. All the Banks, National security agencies etc. use these hash functions to operate securely. Even the green lock that you see beside the address of every site on the browser will not work without it.
In order to solve this problem, IPFS uses Multihash. Multihash allows us to define hashes that are self-defining. So, we can have multiple version of CIDs, according to the hash function used. We will talk more about Multihashes in our Part 4 of the series, which dives deeper into Multiformat.
Well, now we have added our photo to IPFS, but this was not the whole story. What is actually happening is something like this:
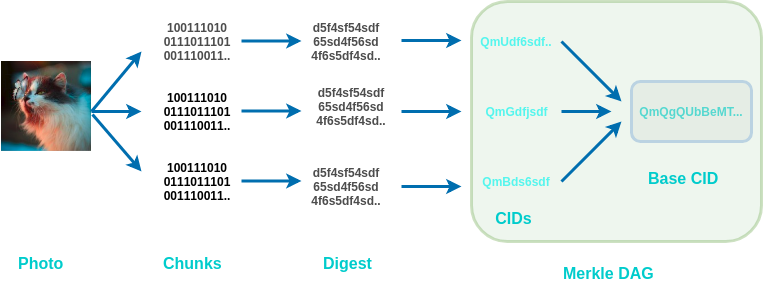
If the files are bigger than 256 kB, then they are broken down into smaller parts, so that all the part are equal or smaller than 256 kb. We can see the chunks of our photo using this command:
ipfs object get Qmd286K6pohQcTKYqnS1YhWrCiS4gz7Xi34sdwMe9USZ7u
This gives us 15 chunks, each of which is smaller than 256kb. Each of these chunks is first converted into a digest and then into CIDs.
IPFS uses IPLD (IPLD uses Merkle DAG, or directed acyclic graph) for managing all the chunks and linking it to the base CID.
IPLD (objects) consist of 2 components:
Data

Links
Every IPLD Link(in our case the 15 links that we got above) has 3 parts:
Name

Hash

Size
IPLD is built on the ideas of Linked Data, which is actually something that folks in the decentralized web community have been talking about for quite some time. It’s something Tim Berners-Lee has been working on for ages, and his new company, Solid, is building a business around it.
Using IPLD has also other benefits. To see this, let's create a folder named photos and add 2 photos into it (the cat pic and a copy of the same pic).

As you can see both the photos have the same hash(which proves that I haven’t changed anything in the copy of the image). This adds De-duplication property to IPFS. So even if your friend adds the same cat photo to IPFS, he will not duplicate the image. This saves a lot of storage space.
Imagine, if I store this article on IPFS, and it’s each letter in chunked and has a unique CID, then this whole article can be constructed by just a combination of alphabets(capital and small), number and some special characters. We will only store every alphabet, number, and character only ONCE and rearrange it according to the Links in the data structure. This is powerful stuff…
IPFS also has a naming system called InterPlanetary Naming System(IPNS). To understand it’s significance let’s imagine that you have created a website and you hosted it on some domain. For this example, we will take my website: https://vaibhavsaini.com
If I want to host it on IPFS, I will simply add the website folder on IPFS. For that I have downloaded the website using wget . In case you are on Linux based OS like Ubuntu or MAC, then you can try it with me.
Download a website(or any website):
wget --mirror --convert-links --adjust-extension --page-requisites --no-parent https://vaibhavsaini.com
Now add the folder named vaibhavsaini.com to IPFS:
ipfs add -r vaibhavsaini.com
You will get something like this:
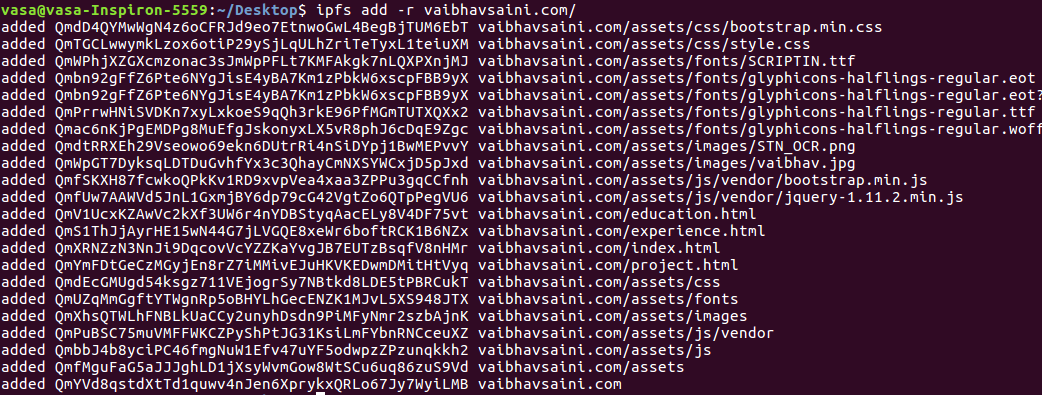
As we can see, our website is now hosted on the last CID(which is the CID for the folder):
QmYVd8qstdXtTd1quwv4nJen6XprykxQRLo67Jy7WyiLMB
We can access the site using http protocol:
https://gateway.pinata.cloud/ipfs/QmYVd8qstdXtTd1quwv4nJen6XprykxQRLo67Jy7WyiLMB/
Let’s suppose if I want to change my profile image on the website. As we have learned above, if we change the content of the input, we get a different digest, which will mean that my final “Base CID” will be different.
This means that I will have to update the hash every time I update my site. Everybody who has the link to my previous website(the above URL) will NOT be able to see my new website 😞
This can result in a great problem.
To address this problem, IPFS uses InterPlanetary Naming System(IPNS). Using IPNS links point to CIDs. If I want to update my website CID, I will just point a new CID to the corresponding IPNS link(this is analogous to today's DNS). We will explore IPNS in depth in Part 3 of this series.
But for now, let’s generate an IPNS link for my website.
ipfs name publish QmYVd8qstdXtTd1quwv4nJen6XprykxQRLo67Jy7WyiLMB
This can take up to a few minutes. You will get an output like this:
Published to Qmb1VVr5xjpXHCTcVm3KF3i88GLFXSetjcxL7PQJRviXSy: /ipfs/QmYVd8qstdXtTd1quwv4nJen6XprykxQRLo67Jy7WyiLMB
Now, if I want to add an updated CID, I will just use the same command
ipfs name publish <my_new_CID>
Using this, you can access updated versions of my website, using this link:
https://gateway.pinata.cloud/ipns/Qmb1VVr5xjpXHCTcVm3KF3i88GLFXSetjcxL7PQJRviXSy
The above link is still not human-readable. We are used to names like: https://vaibhavsaini.com. In Part 3 of the series, we will see how we can link IPNS links to domain names, so you can see my IPFS hosted website on https://vaibhavsaini.com.
IPFS is also a potential replacement to the HTTP protocol. But why do we want to replace HTTP? It seems to work fine, right? I mean you are able to read this article and see movies on Netflix, all using HTTP protocol.
Even if it seems to work fine to us, it has a few big problems.
Let’s say you are sitting in a lecture hall, and your professor asks you to go to a specific website. Every student in the lecture makes a request to that website and are given a response. This means that the same exact data was sent individually to each student in the room. If there are 100 students, then that’s 100 requests and 100 responses. This is obviously not the most efficient way to do things. Ideally, the students will be able to leverage their physical proximity to more efficiently retrieve the information they need.
HTTP also presents a big problem if there is some problem in the networks line of communication and the client is unable to connect with the server. This can happen if an ISP has an outage, a country is blocking some content, or if the content was simply deleted or moved. These types of broken links exist everywhere on the HTTP web.
The location-based addressing model of HTTP encourages centralization. It’s convenient to trust a handful of applications with all our data but because of this much of the data on the web becomes soiled. This leaves those providers with enormous responsibility and power over our information.
Here is where Libp2p comes in. Libp2p is used to communicate data and discovering other peers(computers and smartphones) on the IPFS network. The way this works is that if every computer and smartphone is running IPFS software then we will be part of a big BitTorrent like a network where every system can act as a client and also a server. So, if 100 students are requesting the same website, they can request the website data from each other. This kind of system, if implemented on large scale, can result in significant improvement in speed at which surf the Internet.
Ok, let’s stop here. If you have made it till here then you deserve a pat on your back. Well done😎
Till now, We have learned a lot of things about IPFS. Let’s recap:
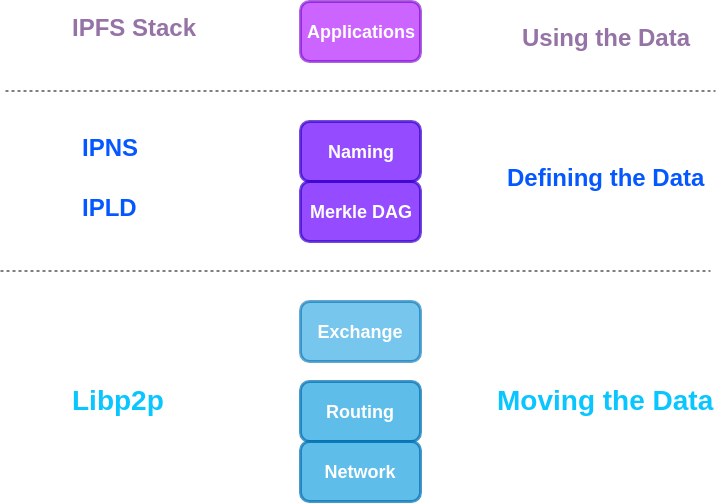
Below is a diagrammatic representation of IPFS stack.
I hope that you have learned a lot. If you want to jump to the next part, head here:
I would like to thank Carson Farmer for writing such an incredible article on IPFS, from which this article takes a ton of Inspiration. You should also try out their Textile Photo App.
Thanks for reading ;)
Learned something? Sign in and upvote to say “thanks!” and share for others! It helps me gain exposure.
- Kauri original title: Understanding IPFS in Depth(1/6) A Beginner to Advanced Guide
- Kauri original link: https://kauri.io/understanding-ipfs-in-depth16-a-beginner-to-advanc/14d7b8a17652428f8c48d5a088a7a400/a
- Kauri original author: Vaibhav Saini (@vasa)
- Kauri original Publication date: 2020-01-13
- Kauri original tags: multiformats, filecoin, ipfs, simpleaswater, libp2p, guide, ipld
- Kauri original hash: QmZrxg6eZZ7ezfbdzkAbrkcBEk4akTw7kwQwGZ8tgT7bkf
- Kauri original checkpoint: Qmekp5iiDi5N5M4KdtAVGBEJEF3ahMgWYZJqL7s1qmkQ9g