Step by step guide “Claim your DNS domain on ENS”
This is a note I took while setting up matoken.xyz ENS address using NameCheap and Google Cloud DNS. Before continuing this blog post, make sure you read the original post by Nick Johnson Nick’s blog post is fairly concise and well written for people who have good understanding of how to administer DNS. If you are not so familiar with administering DNS like me, then this step by step guide with plenty of screenshots may help. (Warning: readers are expected to know how to work with command line tools and git).
0 — Pre-requisite
Before starting this, make sure you have the following.
-
go Ethereum installed on your local machine (Parity may work but I haven’t tried). Your node does not necessarily have to be in sync.
-
Ethereum account for “ Ropsten ” testnet with some Ether preloaded (NOTE: Ethereum account generated from Metamask won’t work as of writing this article).
-
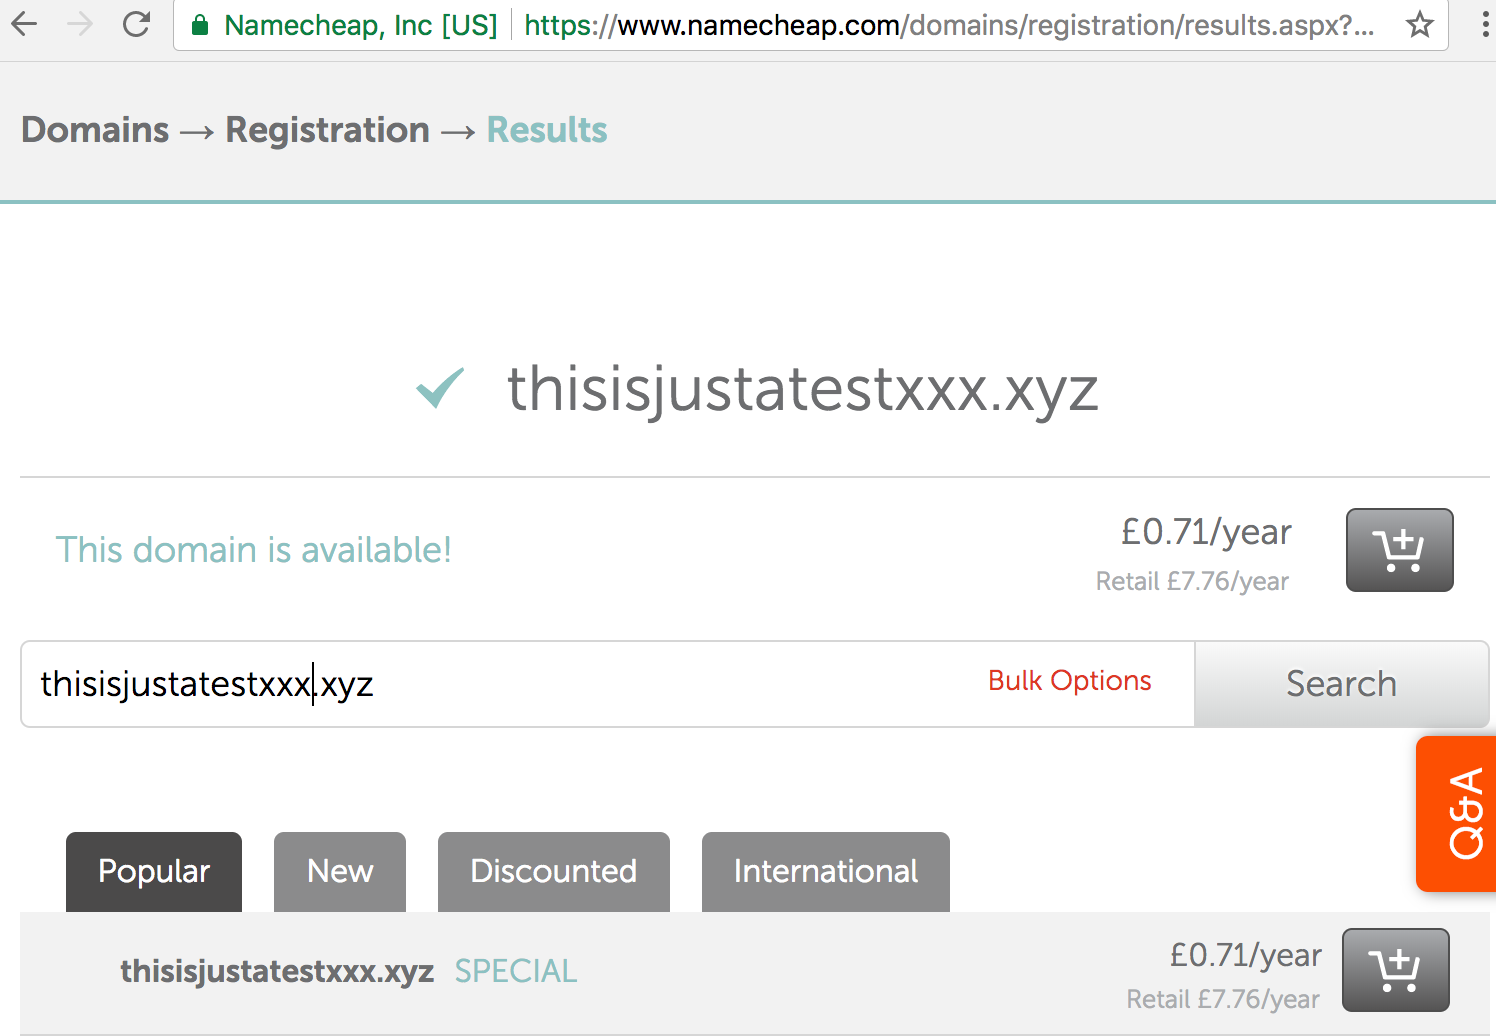
.xyz registered domain and have admin access to change its record (I suggest creating a new domain rather than using your live domain so that you can mess with things. You can get the domain as low as £0.71 for the first year from NameCheap)
1 — Setting up DNSSEC signing
Depending on your DNS provider, this may be really easy, or quite involved.
This is what Nick mentioned in the very beginning. I spent almost half a day figuring out but once you know it all, probably only takes 30 min to actually do it. 1.1 Does NameCheap supports DNSSEC? To figure that out, I read this article.
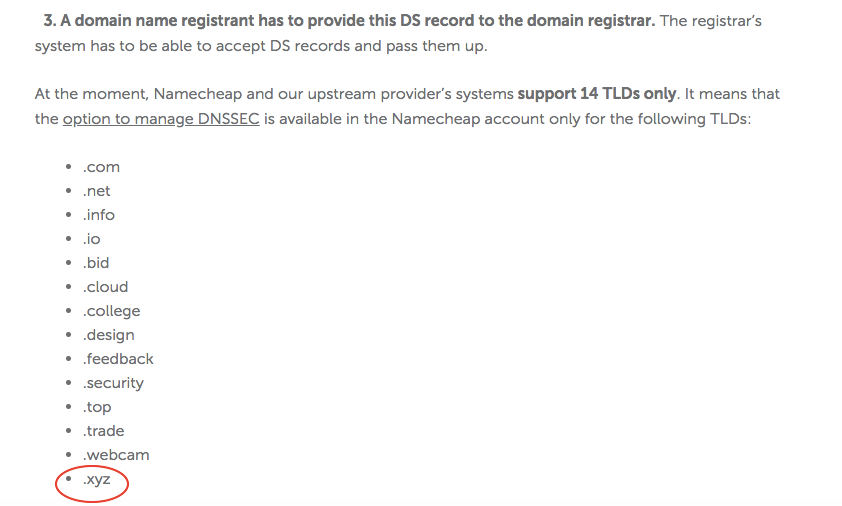
Luckily .xyz domain is one of 14 domains NameCheap supports and enabling DNSSEC is as easy as sliding right… that’s what I thought at first.
1.2 Does NameCheap support the SHA256?
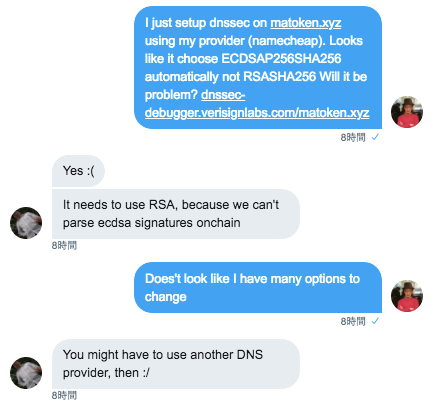
Whatever provider you need, make sure you select RSA signatures and SHA256 hashing.
When you see your domain info using Verisign’s DNSSEC debugger , it tells you which algorithm each layer of DNS provider uses.
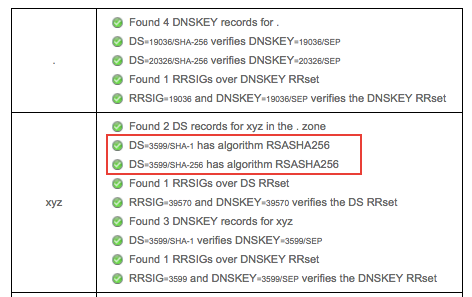
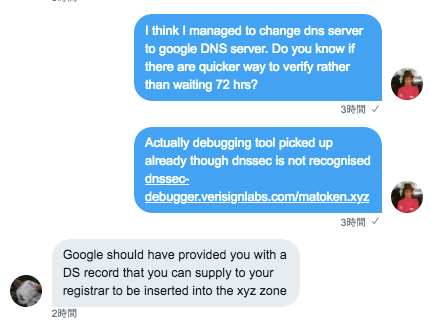
Unfortunately, NameCheap uses ECDSAP256SHA256 for signing messages rather than RSASHA256. I couldn’t find any option to change that from NameCheap admin panel. I initially thought that I have to get another .xyz domain from Google domains (later found out they don’t sell .xyz domain) but he suggested to just change DNS provider.
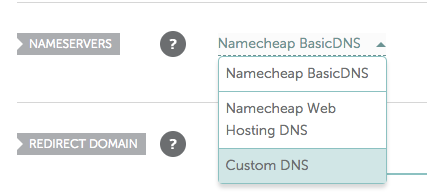
It turned out that it is relatively easy to specify “Custom DNS” from NameCheap admin panel rather than using their own DNS servers.
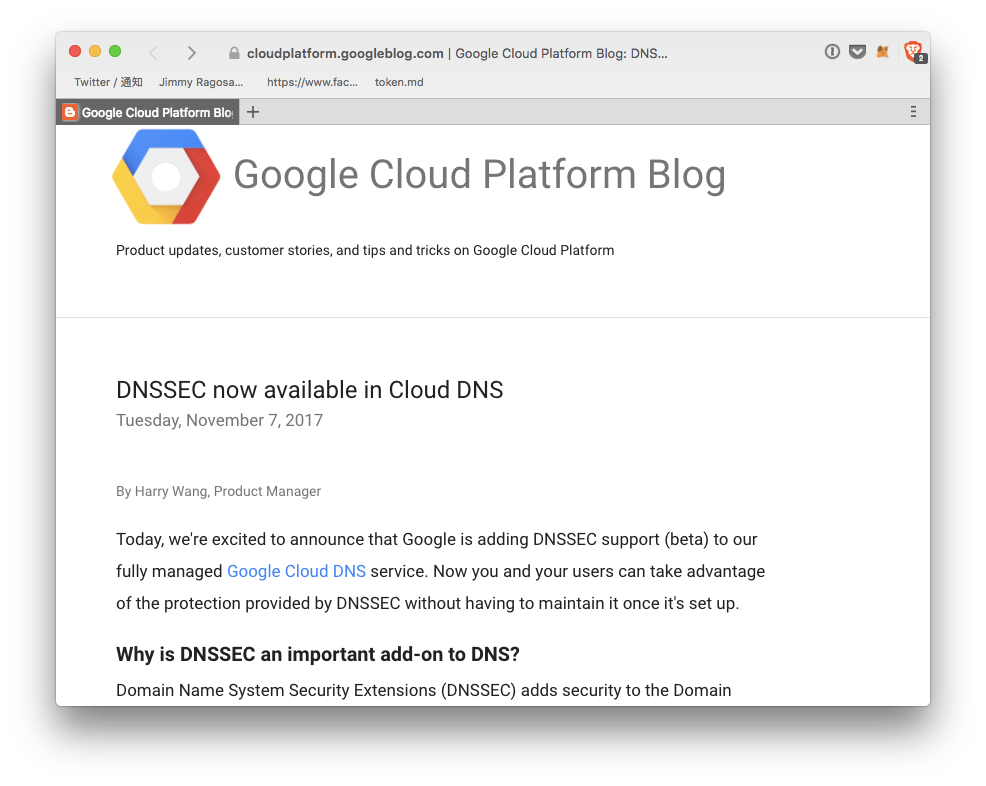
1.3 Use Google Cloud DNS as custom DNS The good news is that Google recently started supporting DNSSEC.
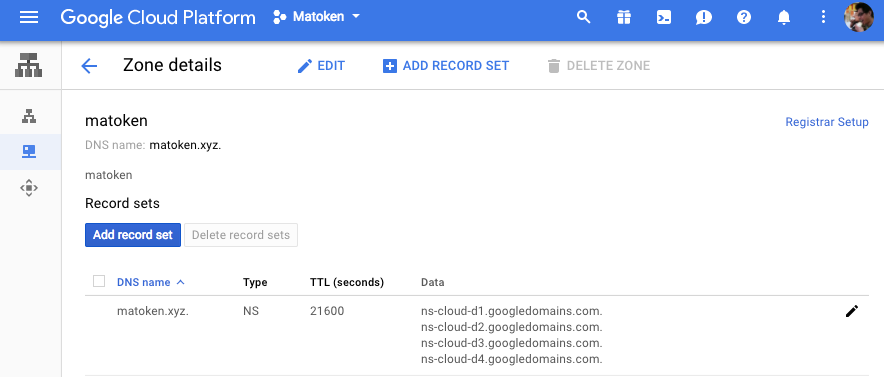
Setting up DNS from Google Cloud public DNS was quite easy. You just fill in “Zone name” (just an identifier you can make it up), DNS name (the domain name you purchased from NameCheap), then enable DNSSEC “ON”.
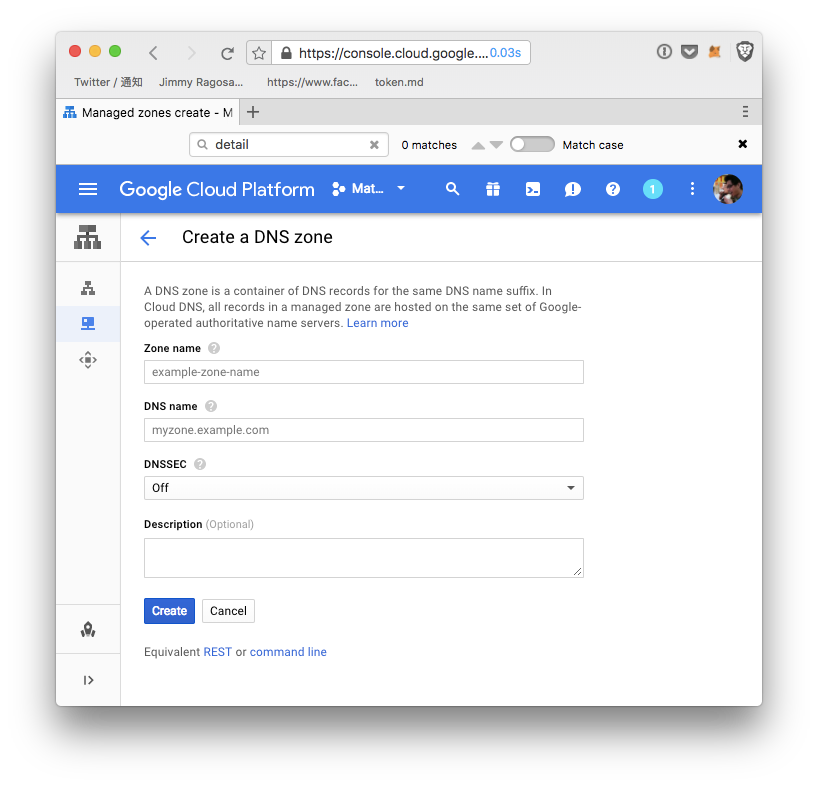
Once created, it will show the list of Google Cloud DNS server names which you can copy & past to your NameCheap admin panel.
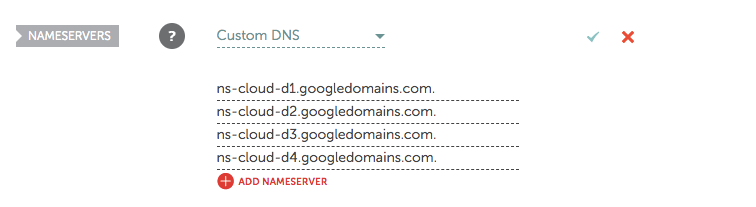
1.4 Point Name Name servers to Google Cloud DNS from NameCheap control panel Now go back to your NameCheap control panel and choose “Custom DNS” which allows you to add name servers you saw from Google Cloud DNS
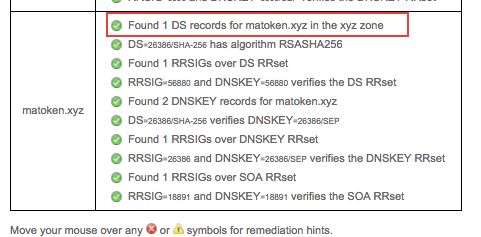
1.5 Add DS Record Is this it? Not quite. When I looked into https://dnssec-debugger.verisignlabs.com/matoken.xyz for the first time, I saw one error message.
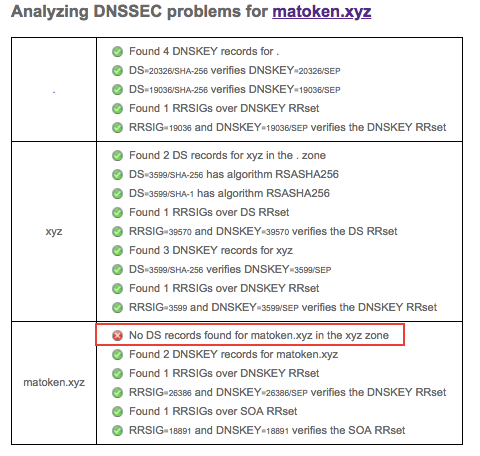
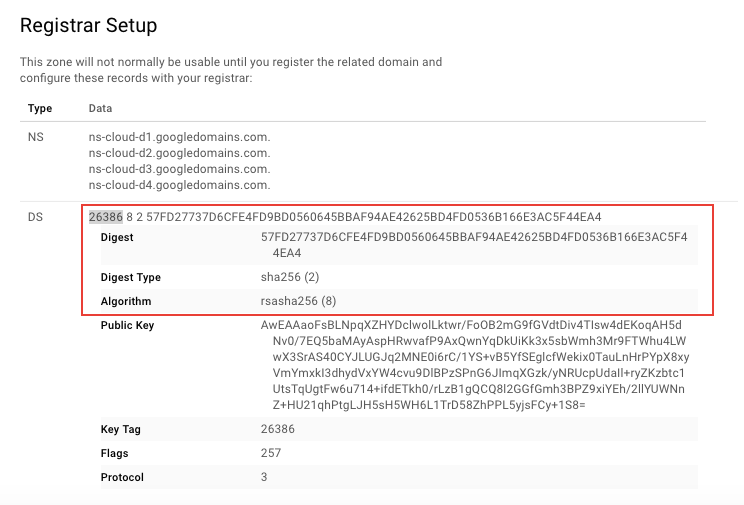
Ah, I have to somehow tell NameCheap about something called “ DS Record ”. DS stands for “Delegation of Signing” and it provides information about a signed zone file(which you created at Google Cloud DNS). Enabling DNSSEC requires this information to complete the setup of your signed domain name (NameCheap). It took a while to find out where DS Record is on Google Cloud DNS panel. but clicking “Registar Setup” will get you to the necessary info.

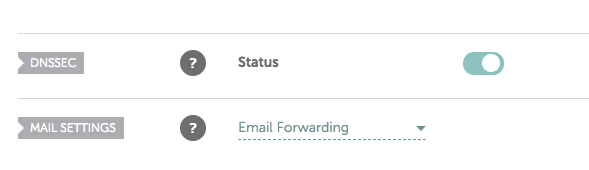
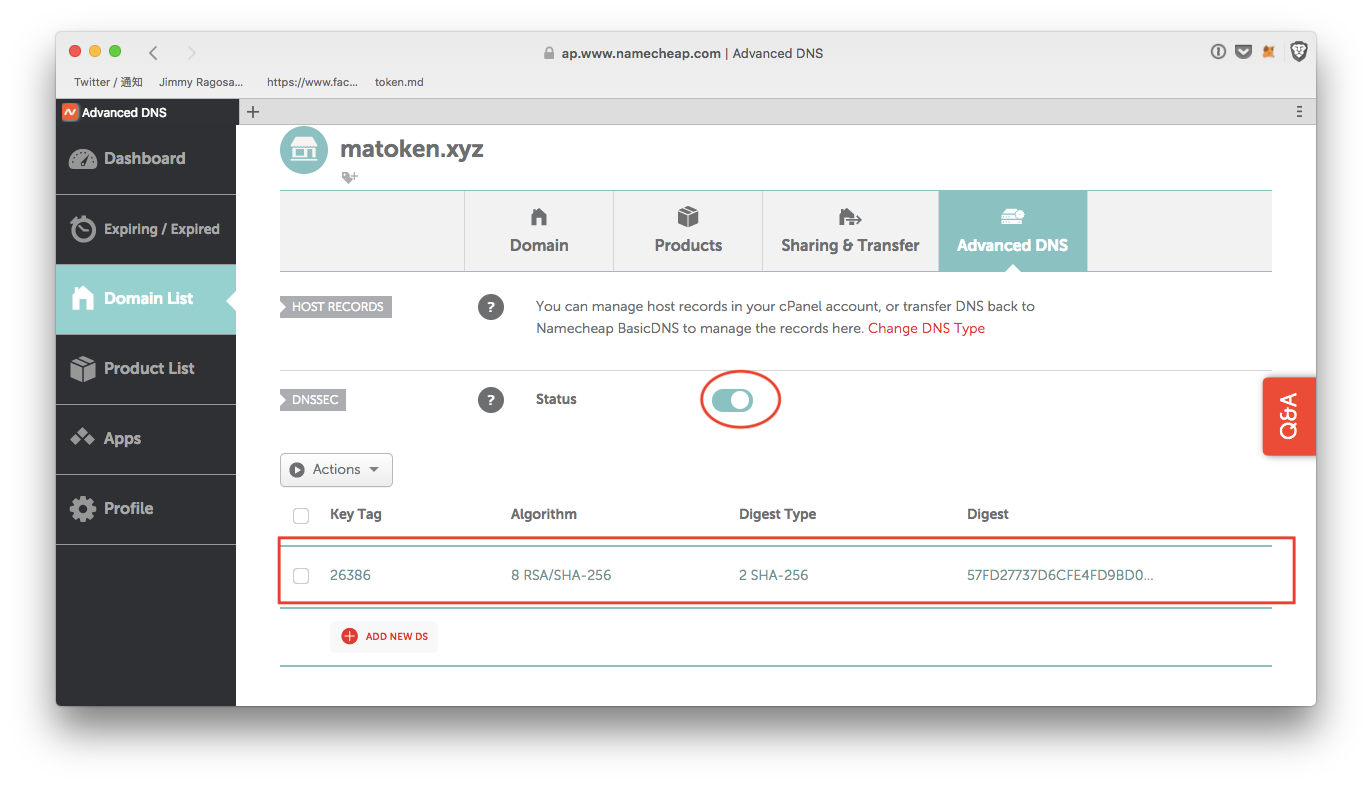
Now go back to NameCheap and activate “DNSSEC” toggling button. It will show you DS record input field which you can paste from Google Cloud DNS.
I probably waited 15 ~ 20 min for the record to be reflected on https://dnssec-debugger.verisignlabs.com/matoken.xyz
You just finished the hardest part. The rest is relatively easy compared to what you have done so far.
2 — Adding a TXT record
To claim ownership of mydomain.xyz, create a TXT record in your DNS zone, _ens.mydomain.xyz, with text data of the form a=0x1234..., where 0x1234... is the Ethereum address you want to give control of the ENS record to.
This part is relatively straight forward. TXT is a type of DNS record literally provides the ability to associate arbitrary text with a host or other name. This is a bit similar how https://faucet.rinkeby.io request you to tweet with your Ethereum address so that you can prove that the twitter account owns the specific Ethereum address.

3 — Interacting with the DNSSEC oracle
3.1 Setup go environment
This part may be super easy if you use golang day to day. I don’t code golang but my Mac already had it installed. Maybe it was installed when I installed go-ethereum ? If golang is installed, you have to set two environment variable, GOROOT, GOPATH, put $GOROOT/bin into your $PATH, then create a folder with src , bin , and pkg folder
[~/src/dnsprove -  (master)] $ which go
/usr/local/bin/go
[~/src/dnsprove -  (master)] $ go version
go version go1.10 darwin/amd64
[~/src/dnsprove -  (master)] $ mkdir ~/work/golang
[~/src/dnsprove -  (master)] $ mkdir ~/work/golang/{src,bin,pkg}
[~/src/dnsprove -  (master)] $ echo export GOROOT=/usr/local/opt/go/libexec >> ~/.bash_profile
[~/src/dnsprove -  (master)] $ echo export GOPATH=$HOME/work/golang  >> ~/.bash_profile
[~/src/dnsprove -  (master)] $ echo export PATH=$PATH:$GOROOT/bin:$GOPATH/bin >> ~/.bash_profile
[~] $ . ~/.bash_profile
[~] $ cd $GOPATH
3.2 Install dnsprove
go get is go equivalent to npm install for node.js or bundle install for Ruby. After taking a while, you should see dnsprove command under $GOROOT/bin directory.
[~/work/golang] $ cd src/
[~/work/golang/src] $ git clone https://github.com/arachnid/dnsprove
Cloning into 'dnsprove'...
remote: Counting objects: 24, done.
remote: Compressing objects: 100% (6/6), done.
remote: Total 24 (delta 0), reused 3 (delta 0), pack-reused 18
Unpacking objects: 100% (24/24), done.
[~/work/golang/src] $ cd ..
[~/work/golang] $ go get
[~/work/golang] $ ls src/github.com/arachnid/dnsprove/
LICENSE     README.md   dnsprove.go oracle      proofs
[~/work/golang] $ ls bin/
dnsprove
3.3 run dnsprove
I usually use rinkeby testnet so rostpen was not in sync. I initially tried to sync with --light but it often fails to find a peer node to sync. To work it around, you can use Infura RPC end point.
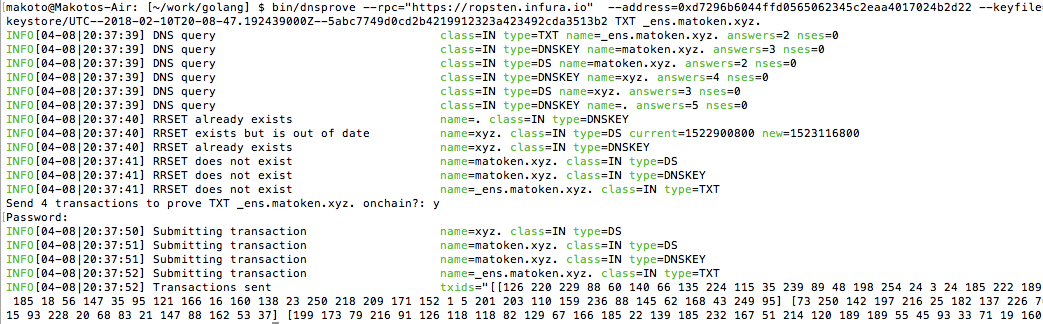
bin/dnsprove --rpc="https://ropsten.infura.io" --address=0xd7296b6044ffd0565062345c2eaa4017024b2d22 --keyfile=YOUROWNKEYFILE TXT _ens.matoken.xyz.
Until this far, I was using an Ethereum address generated by Metamask, but I realised that I have to pass --keyfile which Metamask does not have. That’s why I mentioned at the pre-requisite section that your account has to be generated with geth so that it has keyfile.
Anyway, if all goes well, it should see the following output (it also asks to send 4 transactions).
4— Claiming your domain in ENS
In Nick’s original post, he assumed that you have local geth node in sync so that you can claim the domain from geth console. However, I used Infura remote node so my local node is not in sync? How do I work around? 4.1 Encode your name through node console. The workaround Nick suggested was to first generate the encoded string from node console then copy & paste the outcome to MyCrypto .
[~/work/golang/src/dnsprove - (master)] $ node
> function encodeName(buf, off, name) {
  if(name == ".") {
    buf.writeUInt8(0, off++);
    return off;
  }
for(var part of name.split(".")) {
    buf.writeUInt8(part.length, off++);
    buf.write(part, off)
    off += part.length;
  }
  return off;
}
function hexEncodeName(name) {
  if(!name.endsWith(".")) name = name + ".";
  var buf = new Buffer(name.length + 1);
  var off = encodeName(buf, 0, name);
  return "0x" + buf.toString("hex", 0, off);
}
undefined
> hexEncodeName("matoken.xyz")
'0x076d61746f6b656e0378797a00'
>
4.2 Call claim function from MyCrypto
Once the name was encoded, go to MyCrypto, copy the Contract Address and ABI interface
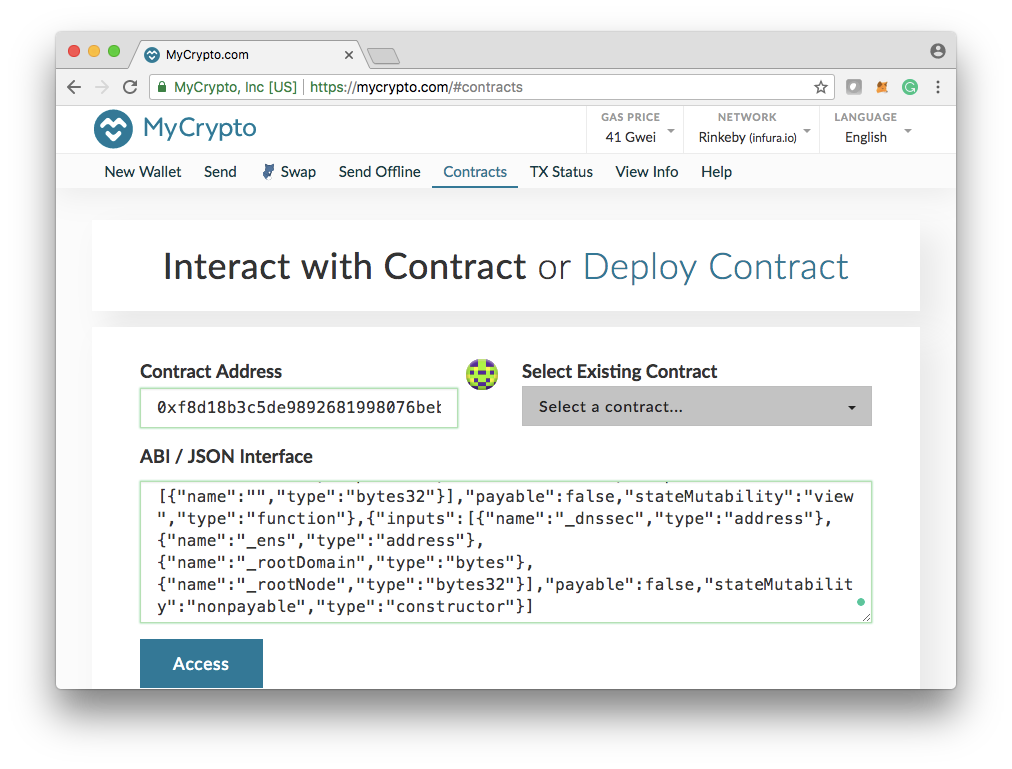
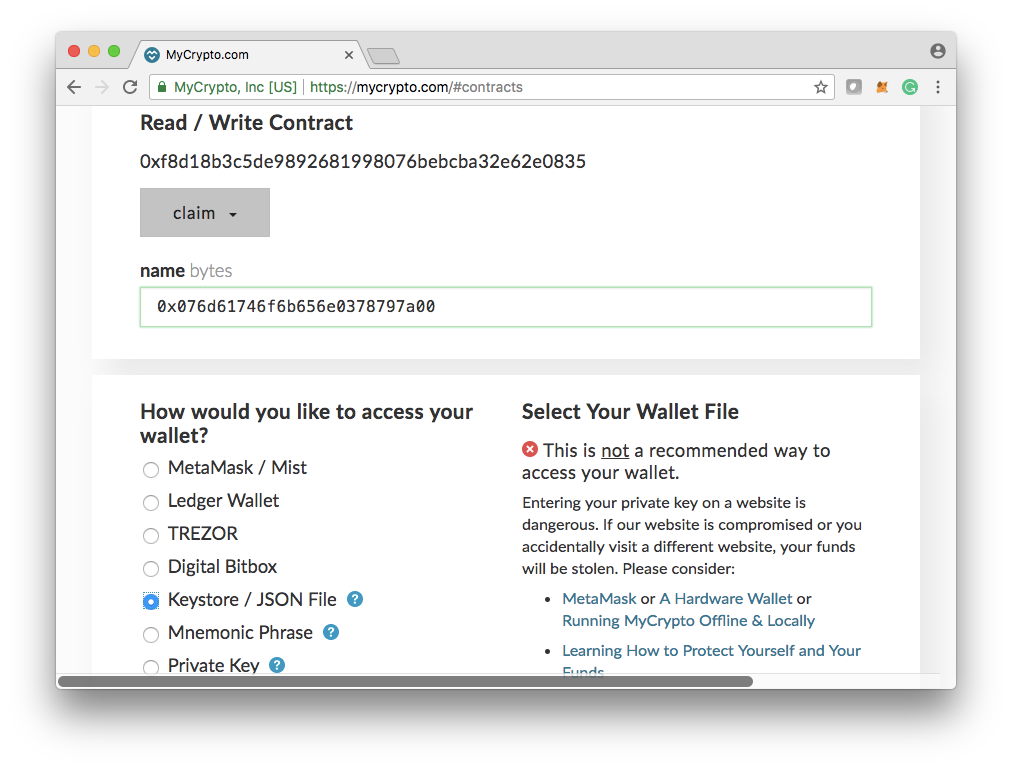
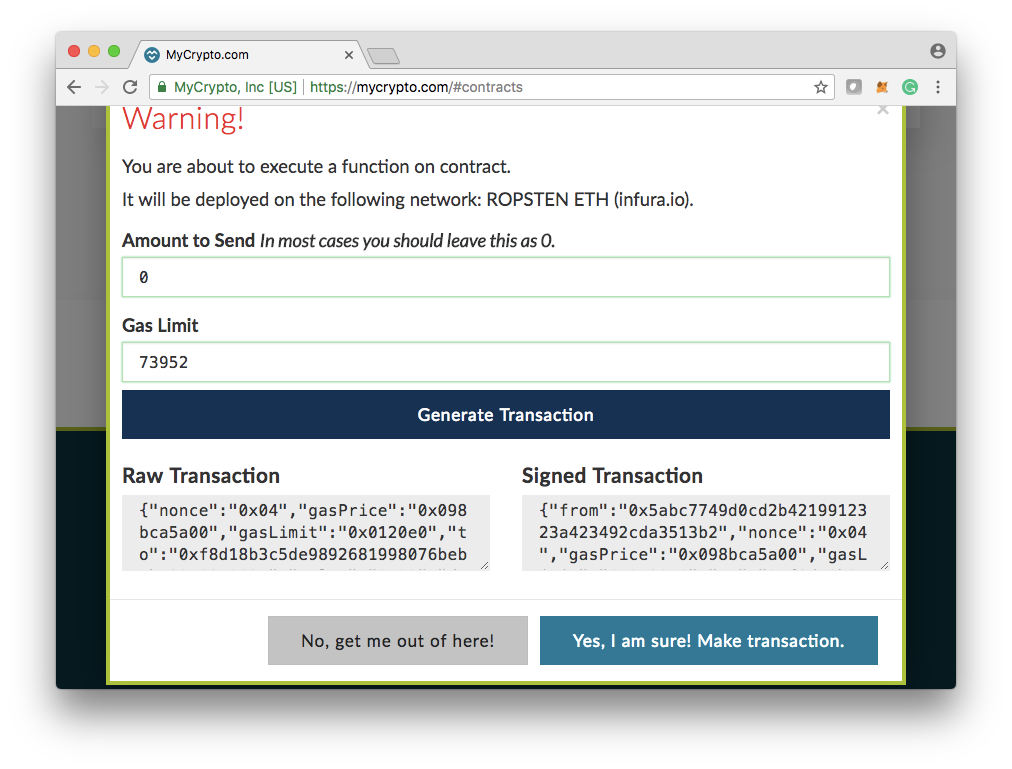
Once MyCrypto recognise the ENS contract, you can pick claim function with passing the encoded name as an argument.
4.3 Verify the result Once the transaction is confirmed, Go to manager.ens.domains with network pointed to Ropsten network.
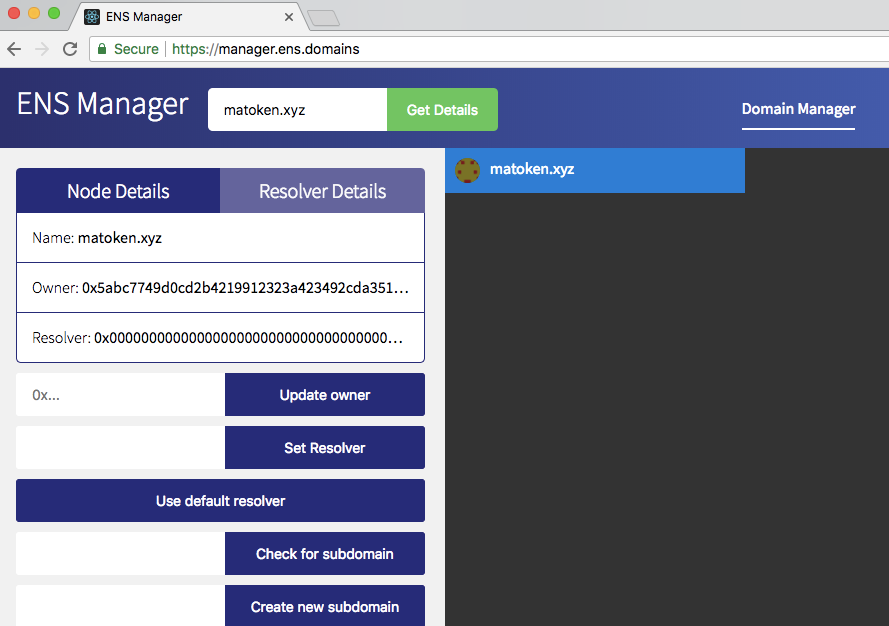
Tada! You can see that matoken.xyz is assigned to the owner name I added onto TXT record on Google Cloud DNA.
Conclusion
Currently it is still quite a lengthy process, but it is cools to be able to claim ENS address tied into your DNS name. I encourage you to try out with different providers and share the knowledge so that it will be easier for ENS team to come up ways to make your on boarding process a lot easier.
(Special thanks to Nick Johnson for helping me completing this work and also reviewing this blog post).
- Kauri original title: Step by step guide “Claim your DNS domain on ENS”
- Kauri original link: https://kauri.io/step-by-step-guide-claim-your-dns-domain-on-ens/02de92af458b488a98379870ae9a91ae/a
- Kauri original author: Makoto Inoue (@makoto)
- Kauri original Publication date: 2018-10-30
- Kauri original tags: none
- Kauri original hash: QmYuy5BVc3Kij5uayVjhmnB366FHc3YjM9Krwpm8vabkXA
- Kauri original checkpoint: QmRS3wCLX2MRi62bg9NTM89qNkgm3XjpKXciLvCKAr1f1g